Image source: wikiHow
To view old Google Maps imagery, the method depends on your device and what type of history you want to see:
Navigating through digital cartography offers a fascinating window into how our neighborhoods, cities, and global landscapes have evolved over the past two decades. While most users rely on mapping applications to navigate the present, these platforms secretly double as powerful time machines. By knowing exactly where to look, you can strip away modern developments and view the world exactly as it was captured years, or even decades, ago.
However, accessing this historical data is not always intuitive. The user interface for time travel varies wildly depending on whether you are using a web browser, a smartphone app, or dedicated desktop software. Furthermore, many users encounter frustrating roadblocks, such as missing icons or blurry images, without understanding the technical reasons behind them.
This comprehensive resource will walk you through the exact steps required to access historical Street View imagery across all devices, troubleshoot common issues when the timeline features disappear, and utilize advanced tools to view satellite imagery dating back to the 1980s and historical paper maps from the 18th century.
The most accessible way to view historical ground-level imagery is through the standard desktop web browser version of Google Maps. Since the Street View project began in 2007, fleets of camera-equipped cars have continuously driven the world's roads, capturing billions of panoramic images. Rather than deleting the old photos when a new pass is made, the platform archives them, allowing users to toggle between different eras of the same location.
To access this archive, you must first enter the standard Street View mode. Navigate to your desired location and drag the yellow "Pegman" icon from the bottom-right corner of the screen onto any blue-highlighted road. Once you are dropped into the 360-degree view, direct your attention to the semi-transparent black panel in the top-left corner of the screen.
According to official support documentation, you need to look for a small clock icon accompanied by a date (e.g., "Street View - Oct 2023"). Clicking anywhere on this date or clock icon will trigger a dropdown menu containing a timeline slider. This slider represents every instance a camera car has driven past this exact coordinate.
As you drag the slider dot to the left, you will travel further back in time. The earliest available dates in major metropolitan areas typically range from 2007 to 2009. When you drag the slider to a new date, a small thumbnail preview will appear below it, showing you a glimpse of that era. To fully immerse yourself in that time period, you must click directly on the thumbnail image. The main browser window will then refresh, loading the high-resolution, 360-degree panorama from that specific month and year.
Once you are in a historical view, you can "walk" down the street just as you normally would. However, be aware that moving too far down a road might suddenly snap you back to the present day. This happens if the camera car from that specific historical year did not drive down the adjacent street, forcing the system to default to the most recent available imagery for your new position.
For years, historical imagery was strictly limited to desktop browsers, leaving mobile users frustrated. Fortunately, the mobile application for both iOS and Android now supports historical Street View, but the feature is hidden behind a specific sequence of gestures that many users never discover organically.
The mobile interface is significantly different from the desktop version. You will not find a clock icon hovering in the corner of your screen. Instead, you must utilize a "tap-up" gesture to reveal the hidden timeline. First, open the app and tap the "Layers" icon (the square over a square in the top right). Select the "Street View" layer and close the menu. The map will now display blue lines indicating where imagery is available.
Tap directly on a blue line to enter the split-screen mode, which shows the 360-degree image on the top half of your screen and the map on the bottom half. At the very bottom of the screen, you will see a white panel displaying the address or coordinates of your current location. You must tap this white address panel and swipe it upward to expand the location details.
Once the location panel is expanded, look for a text link that says "See more dates." Tapping this link is the key to unlocking mobile time travel. It will open a horizontal carousel of thumbnail images at the bottom of your screen. Each thumbnail represents a different capture date. You can swipe left and right through this carousel to browse the available history. Tapping any of these thumbnails will instantly load that historical panorama into the main viewer above.
It is important to note that navigating down the street while viewing a historical date on mobile is often less fluid than on desktop. The mobile app prioritizes the most recent data to ensure navigation accuracy, so you may find yourself frequently having to re-open the "See more dates" carousel if you move your position significantly down a road.
One of the most common frustrations users experience is following the steps above, only to find that the clock icon on desktop or the "See more dates" link on mobile is completely missing. This is not a glitch; it is a result of how the platform handles data density and system performance.
The primary reason the historical tools disappear is due to the Data Density Rule. The platform will only display the time travel interface if the camera car has made more than one pass in that specific location. If a road has only been photographed once in its entire history, there is no "past" or "present" to toggle between, so the interface hides the clock icon entirely to prevent user confusion.
Another major factor is the browser rendering mode. If you are using an older computer, a slow internet connection, or an unsupported browser, the web application may automatically downgrade you to "Lite Mode." Lite Mode strips away advanced features—including 3D buildings and historical Street View—to ensure the map loads quickly. If you see a lightning bolt icon in the bottom right corner of your screen, you are in Lite Mode and will not be able to access the timeline slider until you switch back to the full 3D version.
Finally, there is a stark contrast between rural and urban availability. Major cities like New York, London, or Tokyo might have 15 to 20 different capture dates available, allowing you to watch skyscrapers be built month by month. In contrast, a rural country road might only have one blurry capture from 2008 and one crisp capture from 2021. The availability of historical data is entirely dependent on the physical logistics of the camera fleet's driving routes.
While Street View is excellent for ground-level history, it only dates back to 2007. If you want to see what your neighborhood looked like from above in the 1990s, 1980s, or even earlier, you must graduate from the web browser and use dedicated desktop software. This is where Google Earth Pro becomes an essential tool for researchers, historians, and curious homeowners.
It is crucial to understand the difference between the various versions of this software. The web-based version of Google Earth (which runs in your browser) and the mobile app do not contain deep historical satellite tools. You must download the standalone desktop application called Google Earth Pro. Despite the "Pro" moniker, the software is completely free and has been since 2015.
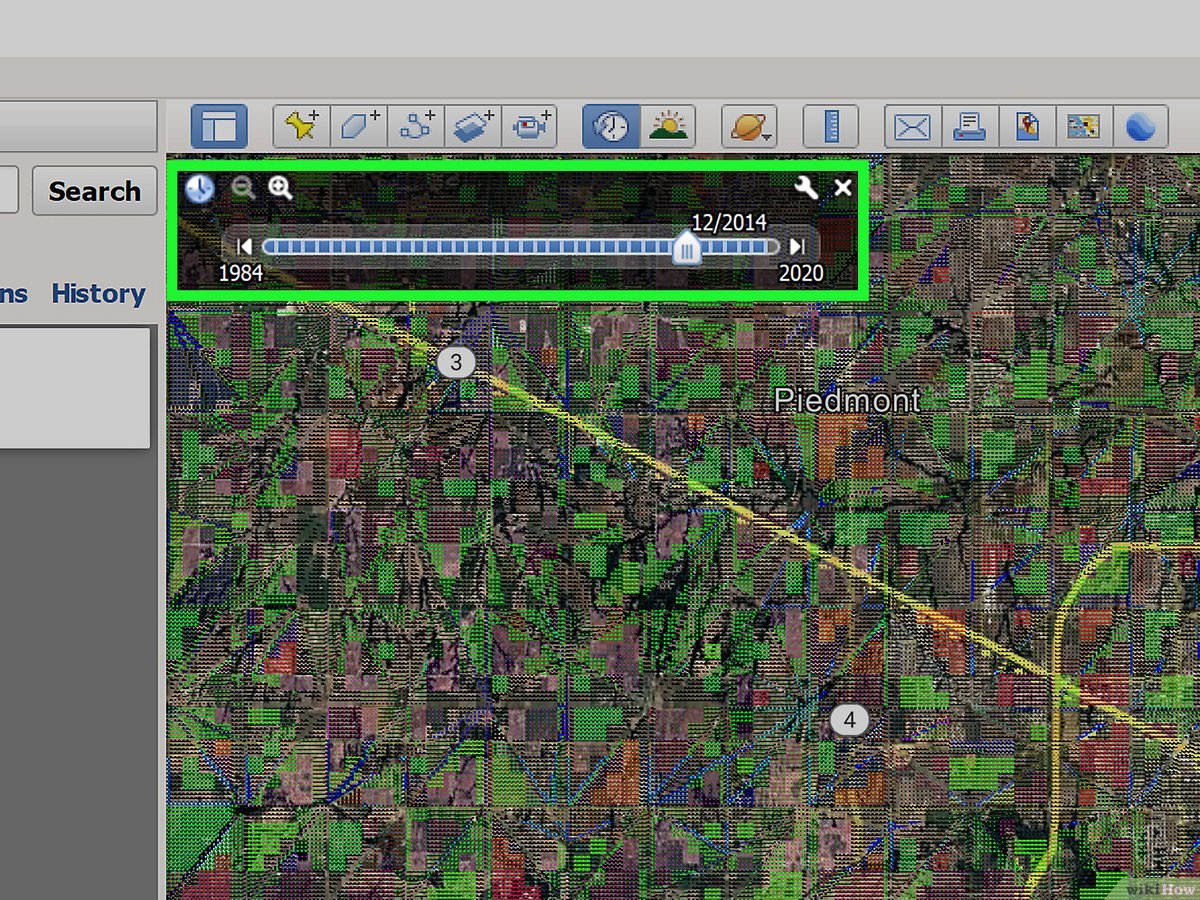
Once you have downloaded and installed the software, search for your desired location. To activate the time machine feature, navigate to the top menu bar and click View > Historical Imagery, or simply click the clock icon located in the top toolbar. A timeline slider will appear in the top-left corner of the 3D viewer.
According to Google Earth Developers documentation, understanding the visual cues on this timeline is key to finding the best images. The slider is populated with tick marks or "dots." Large dots indicate a major update to the imagery in that area, often a high-resolution satellite pass or a dedicated aerial photography flight. Smaller dots indicate minor updates or lower-resolution passes. By clicking the forward and backward arrows, you can jump sequentially through every available image of that location.
A critical technical conflict to be aware of is the interaction between historical imagery and 3D buildings. Modern maps use photogrammetry to generate 3D models of cities. However, these 3D models only exist for the present day. When you activate the Historical Imagery slider, the software automatically flattens the world, disabling the 3D buildings layer. This is intentional; it prevents the jarring visual of a modern 3D skyscraper sitting on top of a 1995 satellite photo of an empty dirt lot.
| Platform | Best For | Historical Range | Key Feature |
|---|---|---|---|
| Web Browser (Maps) | Ground-level changes, storefronts | 2007 - Present | Street View timeline slider |
| Mobile App (iOS/Android) | Quick on-the-go lookups | 2007 - Present | "See more dates" carousel |
| Google Earth Pro (Desktop) | Deep historical research, aerial views | 1930s* - Present | Historical Imagery toolbar |
*Note: 1930s-1950s imagery is generally limited to major US and European cities via archived aerial surveys.
A frequent search query among users is how to view "Google Maps from 1995." This reveals a common misconception about the timeline of internet history. The platform itself did not launch until February 2005. Therefore, there is no native "Google" imagery from the 1990s. However, you can absolutely view satellite imagery from 1995 and 1999 using the Google Earth Pro method described above.
So, what exactly are you looking at when you drag the slider back to 1995? You are viewing integrated third-party data. To build a comprehensive historical archive, the platform ingested massive amounts of public and private cartographic data. For imagery from the 1990s, you are primarily looking at USGS (United States Geological Survey) aerial photography or data captured by the Landsat 5 and Landsat 7 satellites.
Because this imagery predates modern high-resolution commercial satellites, you must adjust your resolution expectations. Modern satellite passes can achieve sub-meter resolution, allowing you to see individual cars in a driveway. In contrast, Landsat data from the 1990s typically has a resolution of 15 to 30 meters per pixel. This means a house might just be a single blurry pixel.
Furthermore, much of the aerial photography from the 1980s and 1990s was captured on black-and-white film before being digitized. If you drag the slider back to 1995 and the world suddenly turns grayscale and blurry, the software is not broken; you are simply viewing the technological limits of civilian satellite imaging from that era.
If your goal is not to look at a specific house, but rather to observe macro-level changes to the planet—such as urban sprawl, deforestation, or glacial retreat—the standard tools are too slow. For this, you need to use a specialized tool called Google Earth Engine Timelapse.
Available via a web browser, the Timelapse tool is a global, zoomable video that stitches together millions of satellite photos to show planetary change from 1984 to 2022. It removes the clouds and creates a seamless, playing animation of the Earth's surface over nearly four decades.
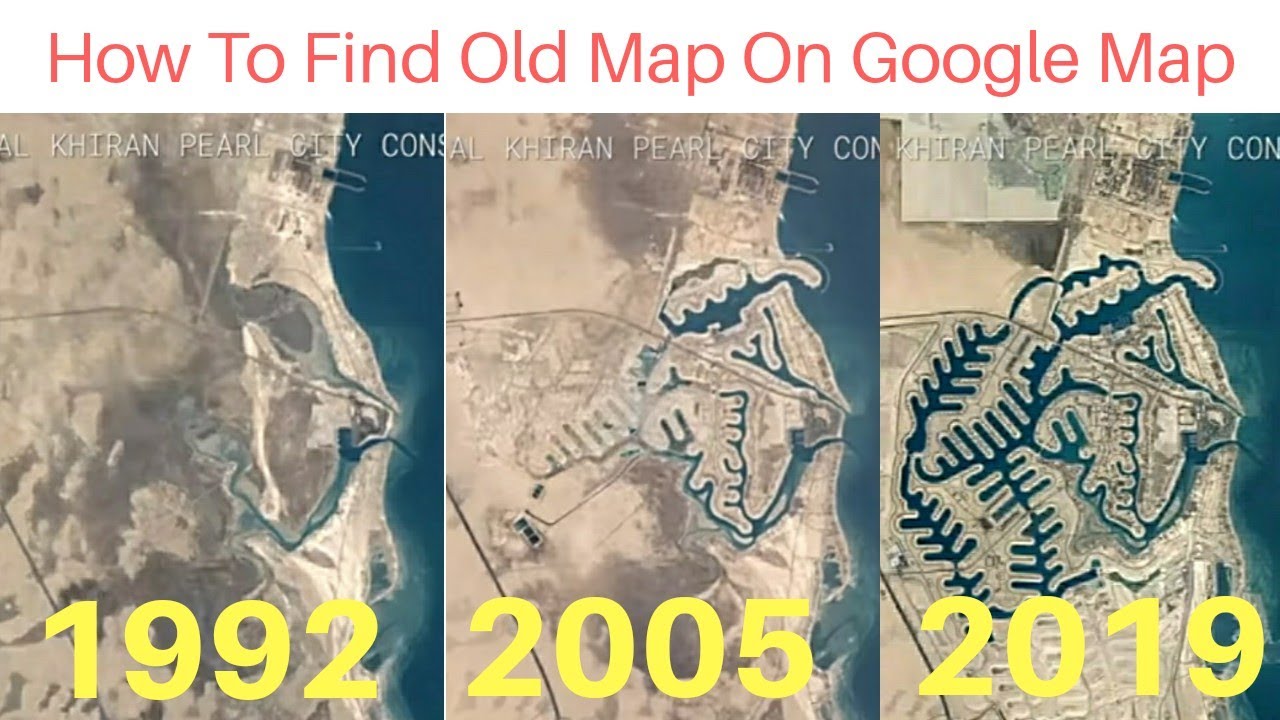
You can use the search bar within the Timelapse interface to find specific landmarks of massive change. Popular examples include watching the construction of Dubai’s Palm Islands, the drying up of the Aral Sea, or the explosive urban expansion of Las Vegas into the surrounding desert. The tool automatically loops the animation, providing a stark, visual representation of how rapidly the human footprint and climate have altered the globe since the mid-1980s.
For true historical deep dives, satellite imagery from the 1980s is not old enough. Historians and genealogists often want to know what a city looked like in the 1800s or 1700s. While there were no satellites, there were meticulous cartographers. Through a partnership with the David Rumsey Historical Map Collection, users can overlay centuries-old paper maps directly onto the modern digital globe.
The David Rumsey collection features over 120 carefully selected historical maps ranging from 1680 to 1930. These are not just static images; they have undergone a complex process called georeferencing. According to the collection's documentation, georeferencing involves taking a scanned paper map and assigning modern GPS coordinates to dozens of specific points (like street corners or coastlines). The software then "stretches" and warps the old paper map so it perfectly aligns with the modern digital grid.
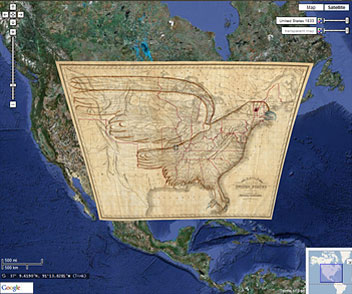
To use this feature, you access the David Rumsey layer within the Google Earth interface. The most powerful tool here is the Transparency Slider. By adjusting the opacity of the historical map, you can fade an 1836 map of Manhattan over the modern 2026 street grid. This allows you to see exactly which modern skyscrapers sit on top of old colonial farms, or how coastlines have been artificially extended through landfill over the centuries.
Sometimes, users searching for "old Google Maps" are not looking for historical photos of the world; they are looking for the historical user interface of the website itself. The platform underwent a massive, controversial redesign in 2013, moving away from the "Classic" interface (characterized by its pale yellow roads, prominent sidebar, and distinct cartographic styling) to the full-screen, vector-based map we use today.
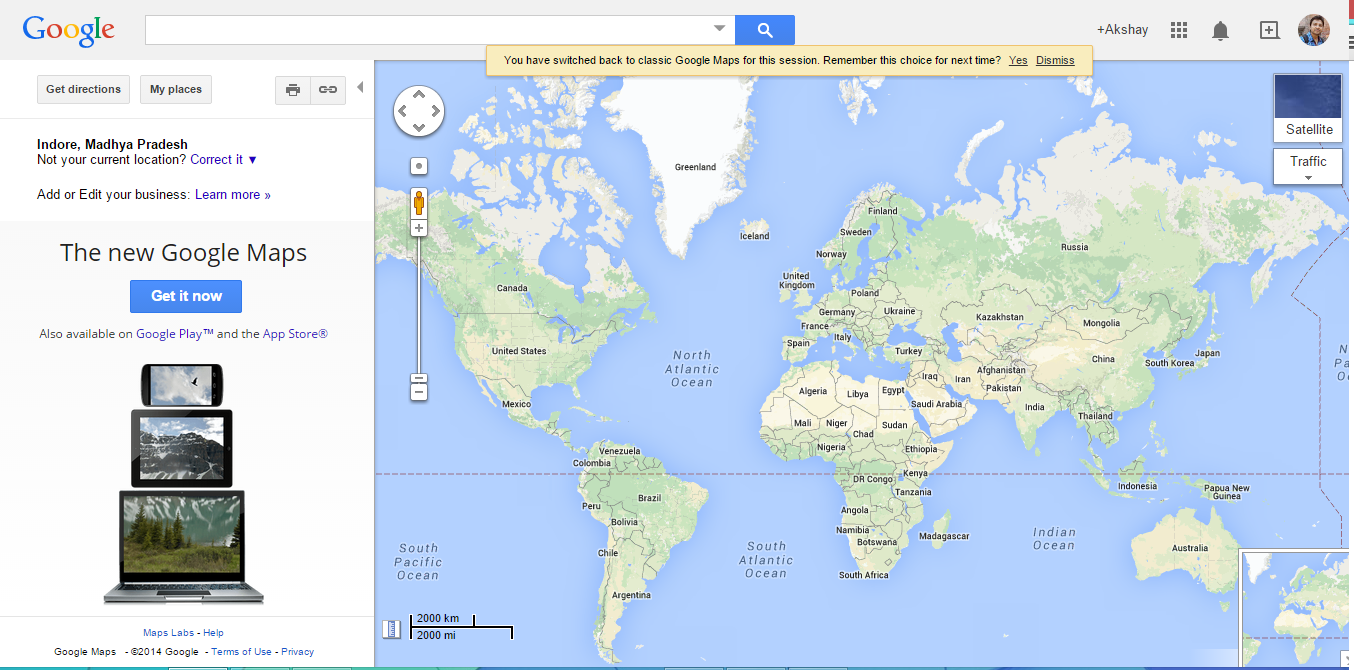
For years, there was a hidden button to "Return to Classic Maps," but this official workaround was permanently retired. Today, there is no native way to revert the live website to the 2010-era UI. The underlying code and API have changed too drastically to support the old frontend.
However, for nostalgia or research purposes, there are two workarounds. First, you can use the Internet Archive's Wayback Machine to view cached snapshots of the website from 2008 or 2010. While the map tiles themselves will likely be broken or frozen, you can view the old layout and sidebar. Secondly, developers often use Google Maps API Styling to create custom maps for websites that mimic the "retro" color palette of the classic era, though this requires coding knowledge and only changes the colors, not the actual user interface layout.
The ability to peel back the layers of time and observe the changing world is one of the most powerful, yet underutilized, features of modern digital cartography. Whether you are a researcher tracking urban development, a genealogist looking for historical context, or simply someone feeling nostalgic for how your childhood neighborhood used to look, the tools are readily available if you know where to find them.
While the interfaces vary across devices, mastering these historical tools ensures you can always access the visual history of any location. Here is a summary of the most important concepts to remember: